Early this spring I lost a calf because it was born in a
heavy rainstorm with about a foot of snow on the ground and I neglected to get
it into some kind of shelter see
Twelve Hours and Racer’s Calf. The cows are
calving earlier and earlier so this scenario is likely to play out again. One
fix for this problem would be to set up a pasture or pen to keep the bull out of the
herd and schedule breeding time so that calving time will
happen later in the year when the weather is better.
At this point in time, I am not really set up to do this or, maybe more accurately, I decided not to do it. Another solution is to provide some kind of
shelter for newborn calves and their mothers. I chose this option thinking that
I could put up a shed in a couple of weekends and we needed a shed for this sort
of thing anyway because sometimes, no matter what you do, the calves come when
they come, which is not always convenient.
As is often the case, I underestimated how much time
would be needed to build the shed. I am not a master carpenter though I have
built a few rough buildings in my day. I also decided to, as much as possible,
use materials salvaged and left over from other projects to build the shed.
This would cut down on material costs. Unfortunately, it also meant that the
construction would go much more slowly because nothing was uniform and I had to
custom cut a lot of the pieces. Doing this project gave me a lot of insight into why so
much stuff is wasted. If your building material isn’t a uniform size or you
can’t store it where it is easy to find, it takes a lot more time to build with
it. If one was doing this as a business that can cost you a lot of money.
I was also sidetracked by a lot of mostly unexpected things
that came up. Most of these weren’t major but they amounted to death by a thousand
cuts for the calf shed project. I had to take Skyeball to the vet (half a day),
I had to go to Urgent Care due to some unexpected complications from a
vasectomy (half a day), I had to help a friend out one afternoon (several
hours), at the last moment, I put up a hundred bales of hay and helped a friend
with his hay (most of a day), I helped excavate a collapsed basement access for
the old house (half a day), I attended two memorial services (half a day each), I had to fix some fence (half a day), we got some sunny weather so I patched some roofs (half a day), we got haying weather so I put up most of the hay I will need for the year (300
more bales plus 300 more for friends) and finally, Vashti got some kind of
infection so we took her into Urgent Care (half a day).
At this writing, the shed is at a good stopping point where
I can walk away from it. The wild blackberries are ripe and I need to pick some, see
Wild Blackberries and ..... The summer hiking season is here as well. I plan to pick up construction
this fall and hopefully finish before winter really sets in.
I probably should have broken this post up into several
different ones but the process of building the shed was so chaotic that I
couldn’t think of a way to string it together into anything coherent. Maybe I
should have done it that way because that’s how life goes.
 |
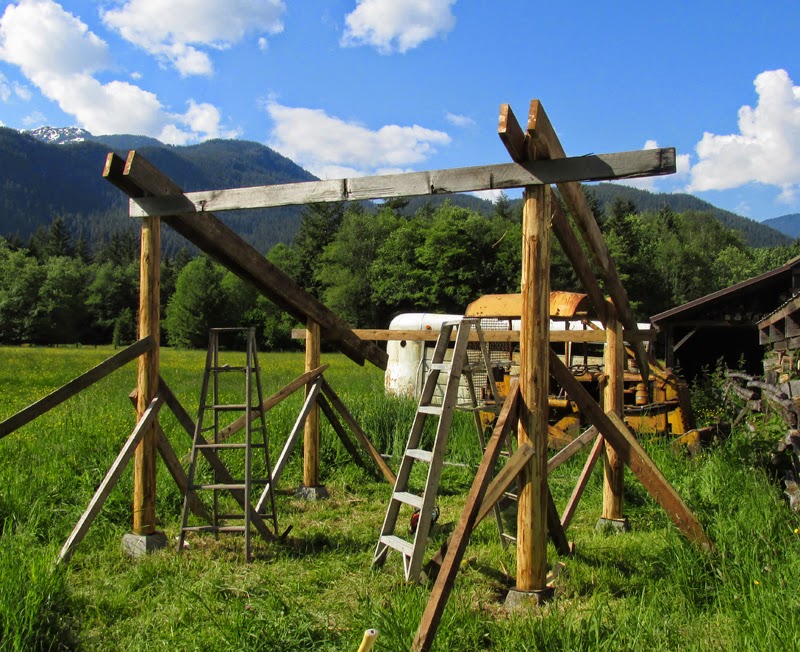
| The site for the calf shed. Near the house with easy access to water. |
 |
| First I cut the grass back with a weedeater and set the post foundation blocks roughly where they will be when the shed is finished. I built the shed 8 feet deep and 10 feet wide. This will hopefully be enough room for the cow and calf to move around a bit without the calf getting trampled. |
 |
| Squaring the foundation blocks. A measuring tape is stretched corner to corner across the center of the building site and the measurement noted. Then it is stretched the same way for the opposite corners. When the measurements are the same, the building is square. |
 |
| Leveling the foundation blocks. For most of these I had to dig a little soil out to level them. In the past I have poured my own foundation blocks but these were ready made at the hardware store for about the same price as a bag of ready mix concrete with the added bonus that I didn't have to pour them. |
 |
| Leveling a foundation block. When the bubble is exactly between the lines the block is level. You can see that this one is still a little off but that is okay. It is within tolerable limits as the reader will shortly see. |
 |
| Leveling foundation blocks to each other. This requires a level long enough to span the distance between blocks or, as I have done here, a straight board that the level can be placed on. I probably got a little too carried away with leveling the foundation blocks, as I have heard it said many times "We're not building a piano here." Or alternatively, "We're not building the Taj Mahal here." I do find though that a little extra effort to get things right from the beginning often pays off in the long run. |
 |
| Cement for anchoring re-bar in the foundation blocks. The rebar will help keep the posts from slipping off the foundation blocks. It is a simple mixture, water and cement stirred with an old screwdriver. |
 |
| Foundation blocks with rebar newly cemented in. The buckets are to put over the blocks to keep the rain out of the anchor cement. |
 |
| Posts and rafters for the shed. The posts were salvaged from various logging jobs I did or was involved with. The boards, which will become the rafters of the shed, were salvaged from a burn pile. |
 |
| I stripped the bark off the posts with a draw knife (pictured) and cut them roughly to length, leaving them about 3 inches long, with the power saw. I really didn't want to work on this project this day but I had a feeling that time was going to be tight this spring so I had better work every day I could. As the reader can see, it was pouring rain. The rain started out as a mist that was okay to work in without rain gear. The mist wouldn't make me too wet. However, the mist gradually turned into heavy rain. This happened so gradually that I didn't notice it, being busy with my task. Strange as it may sound, I suddenly found myself soaking wet. This has happened to me a number of times in my life where the rainfall increases so gradually that I didn't notice it until my clothes soaked through. It usually happens when I am immersed in some project. |
 |
| Using a spade bit to drill into the base of one of the posts. The hole will go over the re-bar that is cemented into the foundation blocks. |
 |
| Foundation blocks ready for posts. |
 |
| A piece of tar paper is placed on top of each block for a vapor barrier and to slow the decay of the post. |
 |
| Posts in place. As the ready can see, several are leaning heavily. This also pulls and shifts the foundation blocks. Therefore, I probably could have spent a little less time fussing around trying to get everything exactly level. |
 |
| The posts have been leveled as best they could be by holding a four foot level along their length. This becomes a little complicated because the posts have a little bit of taper to them and sometimes knots make it impossible to hold the level perfectly true to the post. When I was satisfied with the level of the posts, I anchored the braces to hold the post in place. This was Memorial Day and it was rainy and another day I didn't want to work. However, I didn't work the first half of this day. I spent the first half of this day at Urgent Care dealing with some complications from a vasectomy that I had three weeks before. I won't go into the details except to say that I got the vasectomy because I think there are already enough people in the world and a lot of our problems can be traced back to overpopulation. I think in my case this probably backfired. There will probably be several more babies born because my problems with the vasectomy scared a lot of guys I know. |
 |
| Setting boards, front and back, that span the width of the shed. The rafters will sit on these boards. The board I have for the front is odd shaped and one side tapers across its width. I had to be sure to use the straight, non tapering side up to put the level on. |
 |
| Rafters in place. I nailed them to the posts and also drilled through with a spade bit and bolted the rafters to the posts with all-thread. |
 |
| Cross boards trimmed and several braces installed. Braces stabilize the structure significantly so it won't flex all over the place. I like stable structures so I probably over brace things, putting a brace in every direction. I wanted to at least get this far and have most of the permanent braces installed before I move the cows back to the pasture. Cows love to rub on things like this. They could throw the structure way out of square or even knock it down if it isn't well braced. Note that I installed extra posts in the middle of the shed. This was an afterthought. The rafters are western red cedar which, while it is very rot resistant, isn't very strong. The span is only eight feet and the rafters are full dimension 2 x 8's but I decided to add the extra posts just to be on the safe side. The shed is facing west because we get our worst winter winds from the east so I wanted this direction to be closed off in the shed. |
 |
| Squaring the rafters. The same process used to square the foundation blocks is used to square the rafters. This is a critical part of the building process. The roofing is square so, if the building is not square, the roofing won't fit properly. |
 |
| Rafters trimmed to the proper length for the roofing. I have also added blocks or nailers for the purlins which will span the shed and support the roof. The roofing will also attached to the purlins with screws. There is probably a proper term for the blocks or nailers but I don't know what it is. These blocks stiffen the rafters considerably and make the two one solid unit. Most of these blocks had to be custom cut because the distances between the rafters were all different because the rafters sandwich the posts which are not sawed to a specific standard dimension and are all different sizes. |
 |
| Installing purlins. Again, I think the proper term for these boards that span the width of the shed and will anchor and support the roof is purlins though there might be another term for them with this type of construction. |
 |
| I sued 2 x 6's which should be strong enough for the span which is ten feet. One of the problems one has to deal with up here is getting a lot of snow and then getting a lot of rain on top of that snow. This can put a lot of weight on a roof very quickly. There are several ways to deal with this. One is to make sure your load bearing members, the rafters and purlins are beefy and not spaced too far apart. Another is to have a steep pitch on the roof which will shed the snow quickly when it gets wet and heavy. I couldn't get a really steep pitch for this roof so I tried to beef up the load bearing members. |
 |
| Side view. The all-thread bolting the rafters to the posts is readily visible here. |
 |
| The 2x6's I had for the purlins weren't long enough to span the shed and leave some overhang. So I had to add boards to get roof overhang. I used two boards that were long enough to do the span plus the overhang on the front and back of the shed. I set them where I wanted them, in this case, the overhang was a foot and a half or 18 inches. Then I stretched a tightline across the ends of these boards. |
 |
| Boards were then cut to fill in the overhang areas. The ends of these fill in boards were extended out until they just touched the tightline. These fill in boards were cut to have about 2 feet of overlap with the purlins and were nailed to the purlins. |
 |
| Laying the first sheet of roofing. This is the most important piece. I needed to make sure it was as square as it could possibly be. If it wasn't the whole lay of the roofing would be off maybe to the point where some of the shed wouldn't be covered. |
 |
| Adding sheets of roofing. I used the white four foot straight edge to keep track of the line of the purlins underneath the roofing so I would hit them with the roofing screws. If I missed, I would put an unnecessary hole in the roof. |
 |
| The grass was getting too long on the pasture so I had to move the cows back even though the shed wasn't finished. It was pretty well braced and I had most of the roofing on which also served to stiffen the structure. Part of my work area was outside the pasture so I needed to make sure the cows didn't get out through the gate I left open in order to work and I needed to make sure I closed the gate when I was done for the day. |
 |
| It didn't take long for the cows to come over and investigate. |
 |
| When I was down to the last two sheets, I laid them out and cut the long boards to length and then employed the straight line method to set the fill in boards at the proper length. |
 |
| Roofing completed. The reader will not that the roof on the right side of the shed overhangs more than on the left. I would love to say that I did this on purpose because the extra overhang will create a better windbreak during a northeaster. Sadly, this is not the case. I simply miscalculated the center of the roofing and I didn't catch it until I was done. However, it should make a better shelter on the right side with this configuration so, no harm, no foul. |
 |
| The roofing was salvaged so it was full of holes where fasteners penetrated it for the previous roof. I had to pay attention to make sure the holes were on the crest of the roof ridges and not in the valleys which would encourage leaks. I had to go along and fill each hole with silicone RTV. I did this on a sunny day so the RTV would have a good chance to set before it rained. I also spent the rest of this day patching other roofs. |
 |
| Calves in the calf shed. If I had the shed last spring there would probably be another one in this group. |
 |
| One of the sidetrack jobs was fixing some fence. Neighbors needed to go through our pasture at the Stump Farm to move their old house out and their new house in. I rigged a temporary gate last year for this purpose. The job was done and I needed parts of the gate for other purposes so I removed it. I need to fix several sections of fence but I made this one a priority to get done before I move the cows back up to the Stump Farm. |
 |
| Digging a post hole. I always use a shovel. My dad taught me how to dig post holes this way. The ground here was very good digging. Along the back of the Stump Farm there is a lot of rock which makes digging hard with a shovel and next to impossible with a post hole digger. I don't have a auger attachment for digging post holes with the tractor. |
 |
| As the reader can see, the fence posts were not nice and round like the post holes. |
 |
| So I had to make the holes oblong to fit the posts which I should have done to start with. |
 |
| Fence posts in place. They will be straightened before the holes are filled in and the dirt tamped around them. |
 |
| Post aligned as well as possible with the rest of the fence, which is sagging in places, and tamped in. Dad taught me that the shovel handle makes a very good, handy tamping rod. |
 |
| The barbed wire was stretched back across the gap and spliced together. |
 |
| I also used some hog wire with square mesh in a largely futile attempt to keep the cows from reaching through the fence into the neighbor's shrubs. |
 |
| Back to the calf shed. The last step, probably for now was to add some nailers, boards nailed to the posts that I can nail plywood to in order to keep most of the wind out of the shed in the winter time. |


No comments:
Post a Comment