In my previous post I mentioned the old hunting axiom that
the works starts after you pull the trigger. Processing or cutting up the meat
is some of the hardest work in the process, mostly because it involves a lot of standing
and holding your body in some rather fixed positions for hours at a time. Again,
the subject of this post and the photos contained therein might be offensive to
some readers. I would advise these folk not to read on.
Some commercial meat lockers will cut up your game meat for
you. We have always done it ourselves. I learned how from my mom and dad who
learned from their parents. Since stock and game animal anatomy is very similar
between species and hasn’t really changed for millennia, this practice has been
in my family certainly for over a hundred years and possibly (probably)
stretches back to the dawn of humankind. Butchering might be timeless but using
a freezer, our primary means to preserve and store meat, is definitely a more
modern technology. There are lots of different ways to process meat. This is
the way we do it.
We like to hang our meat to age to tenderize it. It is
always good to protect the carcass against blowflies. Cheesecloth works pretty well. There are also commercially made game
bags, essentially, bags made of cheesecloth that large enough to fit around a
deer carcass. We have used cheesecloth and game bags in the past but for the
last few years we have used clean cotton bedsheets. This method is a throwback
to older times when people had to make do with what they had and use everything
until it couldn’t be used any more and it is an effective method for protecting
meat. The cotton is cool and allows air circulation while keeping flies out of
the meat.
Different people have different preferences but, for our taste, a week is
usually about the right length of time. I was a little
worried that the warmer weather this year might speed things up to the point
that the meat would go bad before we got it cut up but everything worked out
just right. The shed where the deer carcass was hanging stayed cool during the
day and the nights were quite cool so the meat aged well. I usually check
periodically, every few days, to see if the meat is starting to go bad. There
are always a few areas on the carcass where blood collects and I smell these.
Blood with go bad before meat will and I have found it to be a good
indicator of the condition of the meat. About the time the blood starts to sour
the meat is ready to cut up.
We cut up the meat on Sunday the 20th. My mom was
gone this year. She is always a big help. Sacha helped for about six hours
before she had to go get Vashti who was with a friend. I ended up working another
four hours after Sacha left, a total of ten hours. We probably got about 80
pounds of meat for our trouble.
 |
| The deer carcass hanging in the tractor shed. The old bed sheet allows air circulation to keep the meat cool while keeping blowflies away from the meat. |
 |
| Hind quarters of the deer. The front quarters have been removed in order to cut them up. |
 |
| Front quarters ready to be cut up. The white bucket is full of bleach water which we used to wipe everything down with on a regular basis. The meat saw is antique. It was originally my grandfather's. I don't know where he got it from. I can't imagine how many cows, pigs, deer, bear and other animals this saw has cut up in its day. |
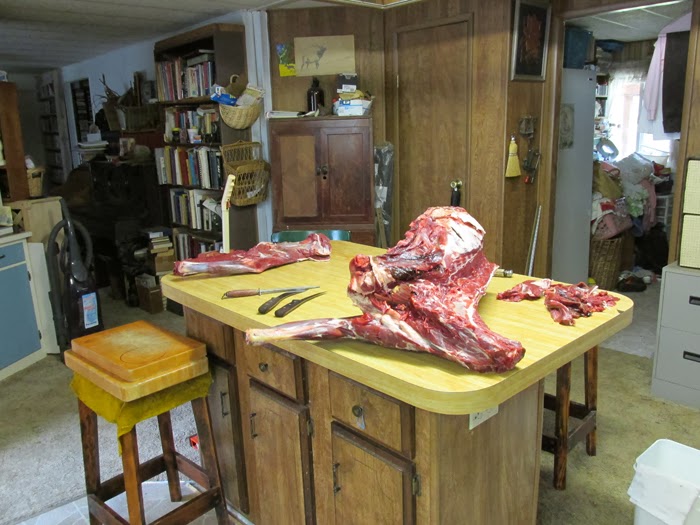 |
| Front quarters with one leg removed and the neck meat and backstraps cut out. |
 |
| Neck meat in vacuum seal bag. We used to use butcher paper for wrapping meat. There are a lot of glitches involved with using the vacuum seal bag but it protects the meat much better from freezer burn. The neck meat pictured here is very tough and needs to be cooked for a long time. We usually make mincemeat, stew meat or ground meat from it. In this case, it will go to make mincemeat. |
 |
| Remains of the front quarter. The rib meat has been cut out. You can make spare ribs, leaving the bone in the meat and save a little more meat. This time, the bullet hit some ribs and the splinters perforated the gut, causing the body cavity to be filled with the gut contents which has a lot of potentially harmful bacteria in it. I washed the body cavity thoroughly when I initially cleaned it but just to make sure, we decided to cut the rib meat out, wash it well and cook it well as stew meat. The stew should also help hide any bad flavors that might linger. This was the last step in the process and the knives used to cut the rib meat were thoroughly washed before cutting any other meat. There is actually not much meat left on the bones here. I used to strive to get every last scrap of meat and I still try to get as much as I can but I have also come to the realization that whatever is left will feed coyotes, crows, ravens and a number of other creatures and I am OK with that. |
 |
| Front leg ready to be cut up. |
 |
| Front leg taken apart at the joints. The first two shorter joints will be roasts. I was able to find each joint and was able to take the leg apart with a knife without using the saw. The lower, longer joint is the shank. It is is full of tendons and sinew and very tough. It will be cut up for stew meat or ground. Nowadays, tendons and sinew are kind of a nuisance but in years gone by they were a very important source of cordage because they are incredibly strong. There is a long tendon that runs along the spine which I understand was very valuable for making bowstrings. |
 |
| Backstraps. These run along either side of the spine and are, by far, the best cut of meat. |
 |
| Cutting steaks from the backstraps. |
 |
| Hind quarters ready to be cut up. |
 |
| Lower spine with backstraps and hind legs removed. The saw and sharpening steel on the stool at the left have been cleaned before being placed on the stool. |
 |
| Hind leg ready to be cut up. The hind leg was removed with a knife at the ball and socket joint that is the equivalent of our hip joint. This first joint of the hind leg down from the hip on a hog is what ham is made from. |
 |
| Cutting steaks from the ham of the hind leg. The meat here is so thick it is hard to cut steaks evenly. It helps if the meat is partially frozen and you cut it with a motorized saw like a band saw. We don't have the capacity to freeze a piece of meat this big or a motorized saw so we make do. |
 |
| Steaks cut from hind leg. |
 |
| Hind leg taken apart at the joint. The smaller piece will be a roast after deboning. The long piece is the shank, which, like the front shank is full of tendons and sinew and will be used for stew meat or ground. Sometimes we save the large bones for a cousin who likes marrow bones. This year we are short on freezer space so they ended up going to the coyotes. |
 |
| End of the day. Sealed packages of steaks, roasts, stew meat and meat that will be ground for sausage another day. |
No comments:
Post a Comment